

I’ve been gearing up for the release of Komodo v2 with a complete overhaul on how I manage the Periphery binary on my homelab nodes. By using Ansible and Forgejo Actions, I can install and update Periphery with a click of a button!
In this guide, I’ll explain what Komodo is, and I’ll go through installing Komodo Core, creating an Ansible playbook to install Komodo Periphery across your fleet, running that playbook with Forgejo Actions, and automating updates with Renovate Bot. Getting to this point took some trial and error, but hopefully this post can guide you through the steps to achieve some neat deployment automation.
Before starting, I recommend having the following:
- Familiarity with Docker and compose files
- Forgejo and Forgejo Actions (Nick Cunningham has a great guide)
- Renovate Bot (covered in another one of Nick’s guides)
- Traefik (Optional)
- OAuth/OIDC (like Authentik or Kanidm - Optional)
The Lizard Wizard
Komodo is a declarative orchestrator for Docker containers in your homelab. First, you define resources like servers, stacks, and repos. Then, you define the relationships between them, like which stack from which repo deploys on which server. This is quite powerful, as Komodo can then be configured to deploy any stacks that have changes committed, like a version update, or deploy newly created stacks all through Git!
For example, let’s say that you’ve committed a compose file to your homelab repository for a bookmark manager, Linkding. You would simply create a new stack and define some necessary options like where it is and where it goes. Komodo will then clone the repository to the target machine, run docker compose up -d, and report container status and logs to the UI. Paired with Renovate Bot, a Pull Request updating the image version can be opened, merged, and deployed automatically!
Komodo also handles all my variables and secrets, passing them to containers via the stack definition. Simply add the variable in the WebUI, add the variable to the stack, and add the variable to the compose. Komodo will then interpolate the value into the compose file upon deployment.
This may be a bit confusing, so here’s an example of how Komodo sees a stack.
[[stack]]
name = "linkding"                       # The name of the stack in the Komodo UI
description = "Simple bookmark manager" # The description of the stack in the Komodo UI
tags = ["internal", "tools"]             # Relevant tags for UI organization
[stack.config]
server = "node-01"                      # Which server to deploy the stack to
links = ["https://linkding.domain.tld"] # A link to the service in the Komodo UI
linked_repo = "homelab"                 # Which Git repository the compose file resides
run_directory = "linkding"              # Which folder the `compose.yaml` file resides
environment = """                       # Komodo will replace ${SOME_SECRET} in the compose file
SOME_SECRET=[[SOME_SECRET]]             # with the value defined in the WebUI
"""
Komodo’s configuration can live within a Git repository as well. This works best especially if you have a lot of stacks to create, which is done faster with copy-and-paste compared to ClickOps. You can even define them in the WebUI and Komodo will commit them directly to the repository on your behalf! I highly recommend storing your Komodo configuration in Git, as you essentially have a versioned backup of changes you make to Komodo.
Komodo can do a whole lot more than just manage compose files. To name a few, it can build and push images to registries, alert you on high resource usage, display logs, exec into containers. To learn more about what it can offer, give their docs a read!
The anatomy of Komodo
Komodo is built with two major components, Core and Periphery.
Core is the WebUI you use to interact with your homelab. When I say Komodo, I’m usually talking about Komodo Core. You only require one instance of Core.
Periphery is the agent that reports to Core and it must be installed on each node you want to control through Core. There are a couple ways to install Periphery, either via container or systemd. I highly recommend going the systemd route, as it will allow Komodo to update itself without hitches.
Initially, communication between the two components was only inbound to Periphery. However, with v2 Periphery can send outbound communication to Core. Having this flexibility can simplify your deployment depending on your network topology. This guide uses the new outbound method. This communication is secured via automatically generated public/private key pairs.
Installing Komodo Core
All right, this is gonna be a pretty hefty compose file, but most of it is just environment variables. You can view all the variables and their definitions in the docs here, but I left some comments to describe some of the more obscure ones. The .env file for secrets comes right after, which you’ll have to fill.
I use Traefik as my reverse proxy, so delete those labels if you do not. I have also externally created a Docker network, frontend, which connects Traefik to the service. Change that according to your setup, or create a network using docker network create frontend. I use Kanidm as my OIDC provider, delete that as well if you do not.
One last note, the compose file below will create two services, Core and MongoDB. Core is connected to both networks, frontend and komodo, while MongoDB is only connected to the komodo network. Because MongoDB doesn’t have to interact with Traefik, we can place it on its own separate network. This is simply a good security practice.
compose.yaml
---
services:
  core:
    image: ghcr.io/moghtech/komodo-core:2.2.0
    container_name: komodo
    restart: always
    init: true
    depends_on:
      - komodo-db
    networks:
      frontend:
      komodo:
    volumes:
      - path/to/komodo/core/config/keys:/config/keys # CHANGE ME
    environment:
      - KOMODO_DATABASE_ADDRESS=komodo-db:27017
      - KOMODO_DATABASE_USERNAME=komodo
      - KOMODO_DATABASE_PASSWORD=${KOMODO_DB_PASSWORD}
      - KOMODO_HOST=https://komodo.domain.tld # CHANGE ME
      - KOMODO_TITLE=Komodo # Displayed in the browser tab.
      - KOMODO_WEBHOOK_SECRET=${KOMODO_WEBHOOK_SECRET}
      - KOMODO_JWT_SECRET=${KOMODO_JWT_SECRET}
      - KOMODO_DISABLE_CONFIRM_DIALOG=true # Replaces the confirm dialog with a double-click
      - KOMODO_DISABLE_NON_ADMIN_CREATE=true # Only admins can create resources
      - KOMODO_DISABLE_USER_REGISTRATION=true # Only the first user to log in will be registered as a user
      # Optional OIDC
      - KOMODO_LOCAL_AUTH=false # Disables user login with a username & password
      - KOMODO_OIDC_ENABLED=true
      - KOMODO_OIDC_AUTO_REDIRECT=true # Automatically redirects login page to the OIDC provider
      - KOMODO_OIDC_PROVIDER=https://auth.domain.tld/application/o/komodo/ # CHANGE ME
      - KOMODO_OIDC_CLIENT_ID=XXX # CHANGE ME
      - KOMODO_OIDC_CLIENT_SECRET=${KOMODO_OIDC_CLIENT_SECRET}
      - KOMODO_OIDC_USE_FULL_EMAIL=false # Makes usernames more concise
    logging:
      driver: local
    labels:
      - komodo.skip # Prevents Komodo from stopping itself with StopAllContainers
      - traefik.enable=true
      - traefik.http.routers.komodo.rule=Host(`komodo.domain.tld`)
      - traefik.http.services.komodo.loadbalancer.server.port=9120
      - traefik.docker.network=frontend
  komodo-db:
    image: mongo:6
    container_name: komobo-db
    restart: always
    command: --quiet --wiredTigerCacheSizeGB 0.25
    networks:
      - komodo
    volumes:
      - path/to/komodo/data/db:/data/db # CHANGE ME
      - path/to/komodo/data/configdb:/data/configdb # CHANGE ME
    environment:
      - MONGO_INITDB_ROOT_USERNAME=komodo
      - MONGO_INITDB_ROOT_PASSWORD=${KOMODO_DB_PASSWORD}
    logging:
      driver: local
    labels:
      - komodo.skip # Prevents Komodo from stopping itself with StopAllContainers
networks:
  frontend:
    external: true # Only if you created the network via `docker network create`
  komodo:
.env
KOMODO_DB_PASSWORD=
KOMODO_WEBHOOK_SECRET=
KOMODO_JWT_SECRET=
KOMODO_OIDC_CLIENT_SECRET= # Optional if you're not using OIDC
You can easily generate an alphanumeric secret in Linux with openssl rand -hex 40
Once that’s done, you can save it on a machine and run docker compose up -d. Savour it, because this might be the last time you have to run that command!
Setting up Ansible
Ansible lets you automate virtually any task (yeah, I took that from their docs) across as many hosts as you want over SSH. I initially wrote a playbook to install and update Komodo, but have since switched to bpbradley’s Komodo role. This role is a marvel, and huge props to bpbradley for their efforts. I’ll walk you through how I set it up for my Periphery installation and upgrades.
First thing’s first, make the following directory structure in your homelab Git repository. The inventory file contains a list of hosts we want to target with a playbook. Under the [komodo] group, list the IP address or hostname of the nodes you want to install Periphery on. Then in [komodo:vars], define the user that Ansible will SSH as.
There’s also the ansible_python_interpreter variable that silences the “automatically discovered Python” warning. Alternatively, you can replace auto_silent with the Python interpreter’s path (e.g., /usr/bin/python3.12), but I trust Ansible to find it.
Directory structure
.
└── ansible/
    ├── inventory/
    │   └── inventory
    └── playbooks/
        └── install_komodo.yaml
inventory
[komodo]
10.0.0.2
example-node.lan
10.0.0.3 ansible_user=some_other_user_if_required

[komodo:vars]
ansible_user=ansible
ansible_python_interpreter=auto_silent
Creating the user
For this, I’ve opted to create a new user, ansible, on each machine instead of using my regular user. It’s good practice to separate users by service, and it’s easy to disable those that you no longer need. You can either create the user manually, or use another Ansible playbook to create the user across the fleet. Then, create an SSH keypair for the ansible user and add the public key to its authorized_keys file in /home/ansible/.ssh/authorized_keys. Copy the contents of the private key to Forgejo secrets as ANSIBLE_SSH_PRIVATE_KEY in Settings > Actions > Secrets > Add secret.
sudo adduser ansible sudo
ssh-keygen -t ed25519 -C ansible -f ~/.ssh/ansible
sudo mkdir /home/ansible/.ssh
echo 'ssh-ed25519 AAAA... ansible' | sudo tee /home/ansible/.ssh/authorized_keys
# Set correct permissions
sudo chown -R ansible:ansible /home/ansible/.ssh
sudo chmod 700 /home/ansible/.ssh
sudo chmod 600 /home/ansible/.ssh/authorized_keys
The ansible user must be able to escalate to root privileges. The above command adds the new ansible user to the sudo group. I highly recommend forcing password authentication for privilege escalation. Test the user out and edit sudoers if necessary.
It is best practice to use different SSH keys for each host. By using one key for all hosts, an adversary can login to all of them from only one leaked key. This guide uses one universal key for the ansible user, so make an informed decision on the security of your infrastructure.
Once you’ve created an ansible user, we have to add its password to the Ansible Vault, an encryption/decryption tool for secrets in Ansible. You’ll need Ansible installed to use it, or you can use the Ansible Docker container. First, generate a password for the Vault. After running the commands below, save the output which we’ll add to the install_komodo.yaml playbook in a bit, and create another secret in Forgejo called ANSIBLE_VAULT_PASSWORD with the same output.
docker run -it --rm alpine/ansible /bin/sh # to enter an Ansible container if you don't have Ansible installed locally
vi password_file # press i to enter insert mode, paste your password, then enter :wq to save and exit
ansible-vault encrypt_string --vault-password-file password_file 'change_me_to_ansible_user_password' --name 'ansible_become_pass'
Writing the playbook
Now, onto the good stuff. The following install_komodo.yaml playbook, as mentioned previously, uses bpbradley’s Komodo role. We’re targetting all hosts in the komodo group, and escalating to root privileges (become: true). This means that the ansible user you created must be able to use sudo. The user’s password is stored in Ansible Vault and passed to the playbook by the ansible_become_pass variable.
Ensure you have any existing Komodo Periphery agents removed
Moving onto the role configuration, we’re installing Periphery under its own user, komodo (visit user manager vs system manager for a comparison). The komodo_version variable will be automatically updated by Renovate Bot after we configure a custom manager (covered at the end).
install_komodo.yaml
---
- name: Manage Komodo Periphery Service
  hosts: komodo
  become: true
  vars:
    ansible_become_pass: !vault |
      $ANSIBLE_VAULT;1.1;AES256
      35643532663130386236386563396534323433306238356339386565306661316239636535613234
      3265316162356338623963636437386236333561356539340a633162303266313064663566383163
      63383138636631343736353635646364326334623131323961323537656561313831326134353333
      6365383934616230340a363566366230386365396364333064326132616232613338376337386333
      66303265653364333635636335646364343232363132663539636437626361613530 # CHANGE ME
  roles:
    - role: bpbradley.komodo
      komodo_action: "install"
      komodo_service_scope: "user"
      komodo_version: "v2.2.0"
      komodo_core_address: "wss://komodo.domain.tld"
      komodo_connect_as: "{{ ansible_hostname }}"
The above playbook will create a new user, komodo, and add it to the docker group. Then, it will create the Periphery configuration file in /home/komodo/.config/komodo. Then, it will create a unit file in /home/komodo/.config/systemd to start the non-root Periphery service and enable linger so the Periphery process stays alive. By default, the komodo user cannot be logged into which is more secure but can make troubleshooting a little tricky. Here are a couple commands to manage the Periphery service and view its logs.
sudo -u komodo XDG_RUNTIME_DIR="/run/user/$(id -u komodo)" systemctl status --user periphery
sudo -u komodo journalctl --user -u periphery
Creating the workflow
With that out of the way, we can set up a workflow with Forgejo Actions that will run our playbook. Forgejo’s documentation on Actions is a great resource that I recommend reviewing. Otherwise, create the following directory structure in your homelab Git repository.
.
└── .forgejo/
    └── workflows/
        └── run_komodo_playbook.yaml
Let’s break down the workflow file below. First, we define when we want the workflow to run, both automatically on any changes to the install_komodo.yaml playbook, and manually with workflow_dispatch. When running manually via the Forgejo UI, we can limit the targets to a single host by typing in its inventory name (e.g., node-02.lan, 10.0.0.2).
Then, we define on which runner the workflow will use, and which container it will execute the tasks on. The Ansible container cannot clone our homelab Git repository without NodeJS, so there’s a task that installs it. Then, it sets up the authentication credentials by copying ANSIBLE_SSH_PRIVATE_KEY and ANSIBLE_VAULT_PASSWORD from Forgejo’s secrets into the Ansible container. After that, it installs the Komodo Ansible role and moves on to executing the playbook.
The Ansible playbook task enters the ansible directory from our cloned homelab Git repository, then executes the playbook with the following arguments.
--private-keydefines the path to our ansible user’s SSH key-idefines the path to the inventory file--limituses any target limit defined in a manual execution--ssh-extra-argsdisables the known_hosts SSH requirement--vault-password-filedefines the path to our Ansible Vault password
name: Run the Komodo playbook

on:
  push:
    branches:
      - "main"
    paths:
      - "**/install_komodo.yaml"
  workflow_dispatch:
    inputs:
      ansible_host_target_limit:
        description: "Limit the targets"
        type: string
        default: "komodo"

jobs:
  run-playbooks:
    runs-on: your_runner_label # CHANGE ME
    container:
      image: alpine/ansible:latest
    steps:
      - name: Install Node
        run: apk add --update nodejs

      - name: Checkout code
        uses: https://code.forgejo.org/actions/checkout@v6

      - name: Set up credentials
        run: |
          mkdir -p $HOME/.ssh/
          echo "${{secrets.ANSIBLE_SSH_PRIVATE_KEY}}" > $HOME/.ssh/ansible_key
          chmod 700 $HOME/.ssh/ansible_key
          echo "${{secrets.ANSIBLE_VAULT_PASSWORD}}" > $HOME/.vault_pass.txt

      - name: Install Ansible role
        run: ansible-galaxy role install bpbradley.komodo

      - name: Run Ansible playbook
        run: |
          cd ${{ forgejo.workspace }}/ansible
          ansible-playbook --private-key $HOME/.ssh/ansible_key \
          -i inventory playbooks/install_komodo.yaml \
          --limit=${{ inputs.ansible_host_target_limit }} \
          --ssh-extra-args="-o StrictHostKeyChecking=no" \
          --vault-password-file $HOME/.vault_pass.txt
After committing this to your homelab Git repository, it’s ready to execute!
Updating with Renovate Bot
Although this guide won’t cover setting up Renovate Bot in Forgejo, you can follow Nick Cunningham’s guide as a reference.
In your .renovaterc.json (or whatever you named your Renovate configuration), add the following manager. To group Periphery and Core upgrades into one Pull Request, you can also add the package rule.
  "customManagers": [
    {
      "customType": "regex",
      "managerFilePatterns": ["ansible/playbooks/install_komodo.yaml"],
      "matchStrings": ["komodo_version: [\"']v?(?<currentValue>.+?)[\"']"],
      "datasourceTemplate": "docker",
      "depNameTemplate": "ghcr.io/moghtech/komodo-periphery"
    },
  ],
  "packageRules": [
    {
      "matchPackageNames": ["ghcr.io/moghtech/komodo*"],
      "groupName": "moghtech/komodo"
    }
  ]
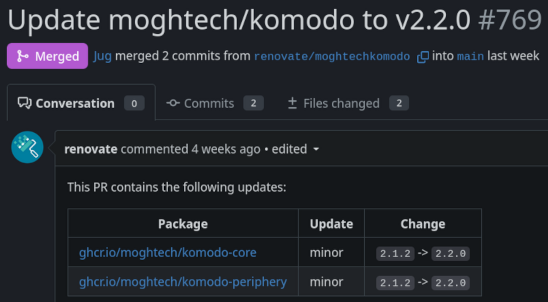
With everything properly configured, Renovate will announce new releases of Komodo with a Pull Request in your forge. All you have to do is merge the branch, which will kick off the Ansible playbook to upgrade your fleet to the newest Periphery binary as well as upgrade your Core version.
Afterword
Congratulations on making it to the end! If you haven’t used Ansible or Forgejo Actions much before, I hope you learned a bit about these tools and how to better incorporate them into your homelab. It’s a great way to run playbooks across any number of hosts, even those in the cloud.